
I've built portal websites for agencies, internal teams, and client-facing workflows. This guide covers how to create a portal website in 7 steps, with a spec template and launch checklist that work, whether you're building for clients, employees, or partners.
What is a portal website?
A portal website is a secure, login-gated site where a specific group of users accesses personalized information, tools, and services in one place. Unlike a public website that shows the same content to everyone, a portal delivers different views based on who logs in.
An account manager sees every active client project. A client sees only their own project status and invoices. An admin sees user management and settings nobody else touches.
Portals consolidate what would otherwise live across email threads, shared drives, ticketing systems, and spreadsheets. The point is to give each user a single destination for the information and actions they actually need.
Types of portal websites
The structure is similar across every portal type, but the audience and content change depending on who logs in. Here are the most common types that teams build:
- Client portals. Your clients log in to check project progress, download files such as contracts and deliverables, and submit requests instead of emailing you every time they need an update. Agencies, consultants, and service firms use these the most.
- Employee portals. Your team logs in to find company policies, submit time-off requests, open IT tickets, and read internal news. Cuts down the "where do I find this?" messages to HR.
- Customer portals. Your paying customers log in to check orders, update their account, get help, or browse how-to articles. Common for online stores and subscription businesses.
- Vendor and partner portals. Your suppliers or partners log in to submit invoices, upload documents, and check contract details.
- Student portals. Students log in to see grades, download course materials, check schedules, and message faculty.
- Member portals. Members of a club, association, or community log in to access directories, register for events, pay dues, and view exclusive content.
Every type follows the same pattern underneath: login, role-based views, a database, forms, and workflows. What changes is who logs in, what they see, and which tools the portal connects to.
Key features every portal website needs
Regardless of which type you're building, every portal needs to cover the same six capabilities:
- Secure login with role-based access. Users authenticate before seeing anything, and different roles see different content. Without this, you don't have a portal. You have a public website.
- A database to store and display content. Users, records, documents, and activity need somewhere to live. The database drives what each user sees on their dashboard.
- Personalized dashboards. Users should land on a page tailored to who they are. A client sees their active projects. An employee sees their open requests. Generic homepages kill adoption.
- Search. Once the portal has more than a handful of pages, users need a fast way to find a specific policy, document, or record. Good search is often the difference between a portal people rely on and one they abandon.
- Forms and request handling. Most portals need a way for users to submit something (a request, a document, or feedback) and see what happens to it afterward.
- Integrations with your existing tools. Portals rarely live in isolation. They pull data from spreadsheets or CRMs, push notifications into Slack or email, and sometimes process payments through Stripe.
If the building platform you're evaluating can't cover all six, the portal will run into walls fast.
This guide uses the AI no-code builder Zite because it covers many needs in one platform: login, database, permissions, workflows, forms, and integrations, with no per-seat pricing as usage grows.
What you'll need before starting
You only need a few things to begin:
- An AI portal builder like Zite: Sign up for a free trial or log in if you already have an account.
- Your client list (optional): If you have existing client data in a spreadsheet or Airtable, have it ready. Zite can import it, or you can start fresh and add records later.
- Company website URL (optional): Zite's branding kit reads your website and automatically pulls your colors, fonts, and styling. The result feels like a real extension of your business, not a generic third-party tool, which matters most when clients or external users are logging in for the first time.
Time required: About 45 to 60 minutes. Zite generates the core portal in a few minutes. The rest goes into reviewing what got built, adjusting permissions, and connecting your existing tools.
How to create a portal website in Zite (step by step)
For this walkthrough, I'll build a client portal for a small agency that lets clients log in, view their active projects, download shared documents, and submit change requests without emailing back and forth.
The same approach works for any portal type. Adjust the prompt to match your audience.
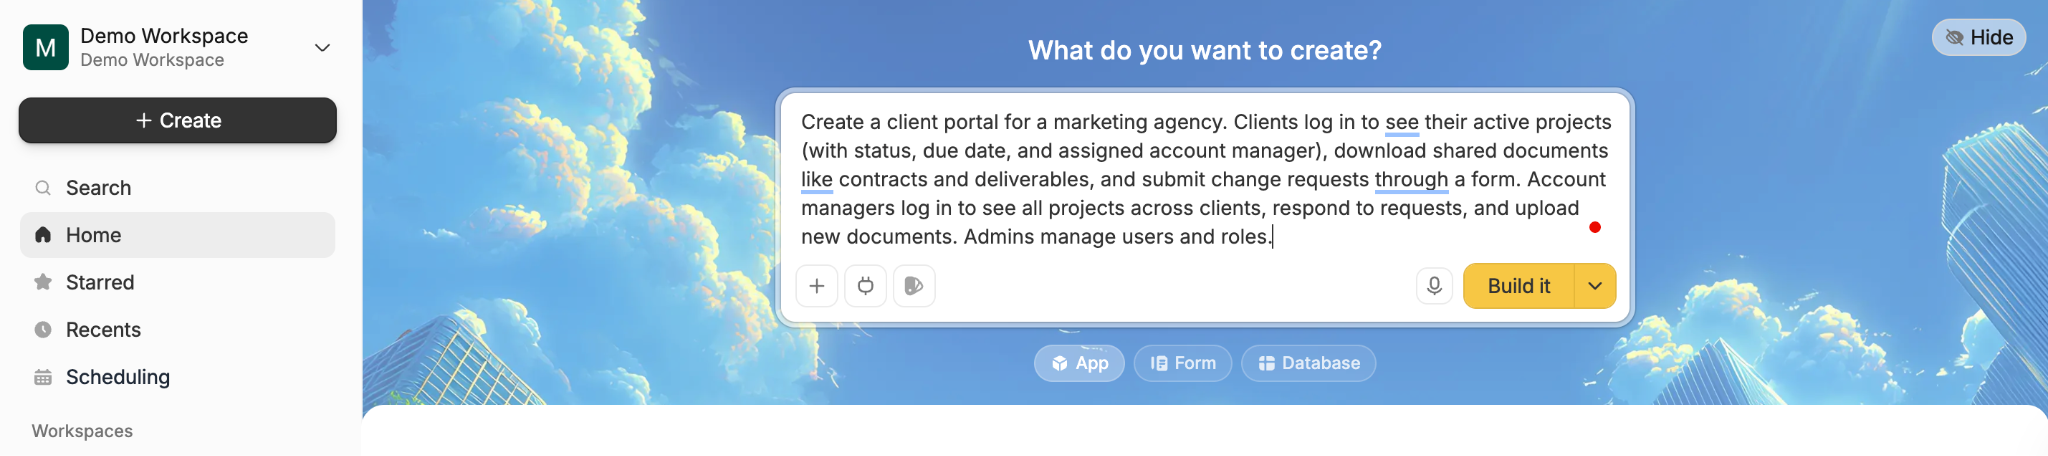
Step 1: Start a new app and describe your portal
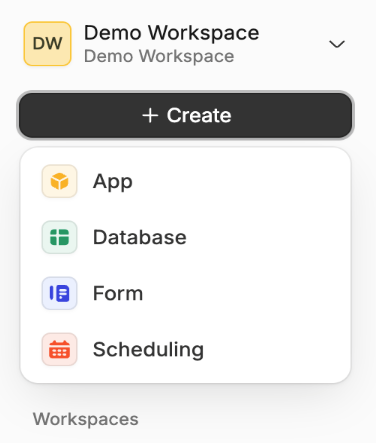
Log in to your Zite account. A prompt box sits on the home screen by default, so there's no menu to open before you start typing. Make sure App is selected as the build target, then describe your portal directly in the box.
Be specific about who logs in, what they see, and what actions they can take. Vague prompts produce vague apps.
Here's the prompt I used to make a portal:
Create a client portal for a marketing agency. Clients log in to see their active projects (with status, due date, and assigned account manager), download shared documents like contracts and deliverables, and submit change requests through a form. Account managers log in to see all projects across clients, respond to requests, and upload new documents. Admins manage users and roles.
If you want a closer look before Zite starts building, switch to Plan mode instead. Zite proposes the database, sketches each screen, and waits for you to iterate on the structure before any pages get generated.
For portals where the data model and page layout need to be right the first time, this is often faster than building straight away and adjusting afterward.
Once the plan looks right, click Build.
Step 2: Review and approve the database
Zite doesn't build the app right away. It proposes a database first and waits for your input. That review step is intentional because the database drives everything the portal does. If the tables and fields are wrong, every page and workflow built on top of them inherits the problem.
For my prompt, Zite proposed a database called "Agency Client Portal" with four tables:
- Users: email, first name, last name, role, company.
- Projects: project name, status, due date, description, client (linked), account manager (linked).
- Documents: document name, category, file, project (linked), uploaded at, uploaded by.
- Change Requests: title, description, status, project (linked), submitted by, submitted at, manager response, responded at.
The structure is richer than what most non-technical teams would make by hand.
Zite connected the tables automatically (so every document and request ties back to the right project and client) and added useful fields I didn't ask for, like timestamps for when a change request was submitted and when a manager responded.
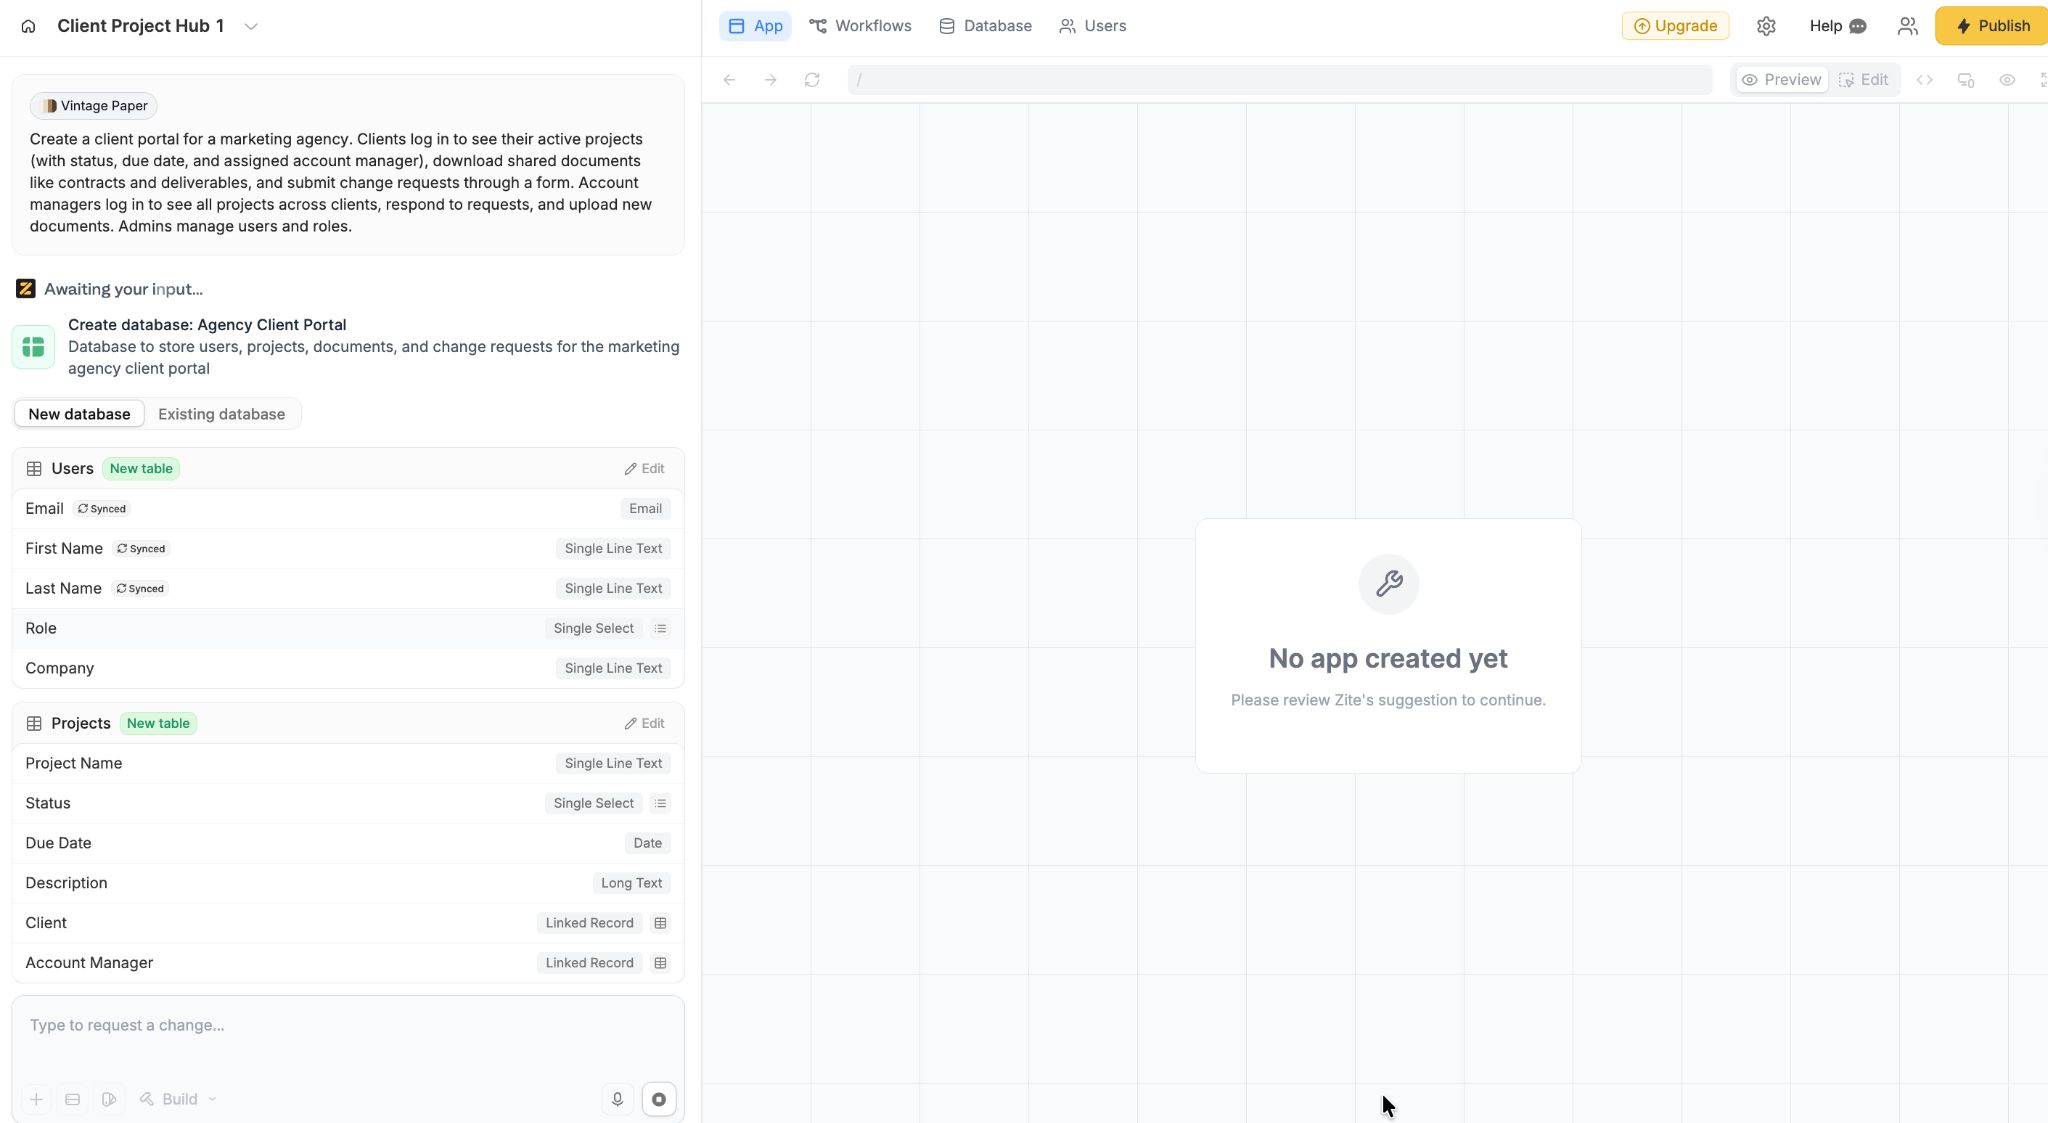
Scroll down to review the remaining tables. At the bottom of the panel, you'll see the Create Database and Skip buttons.
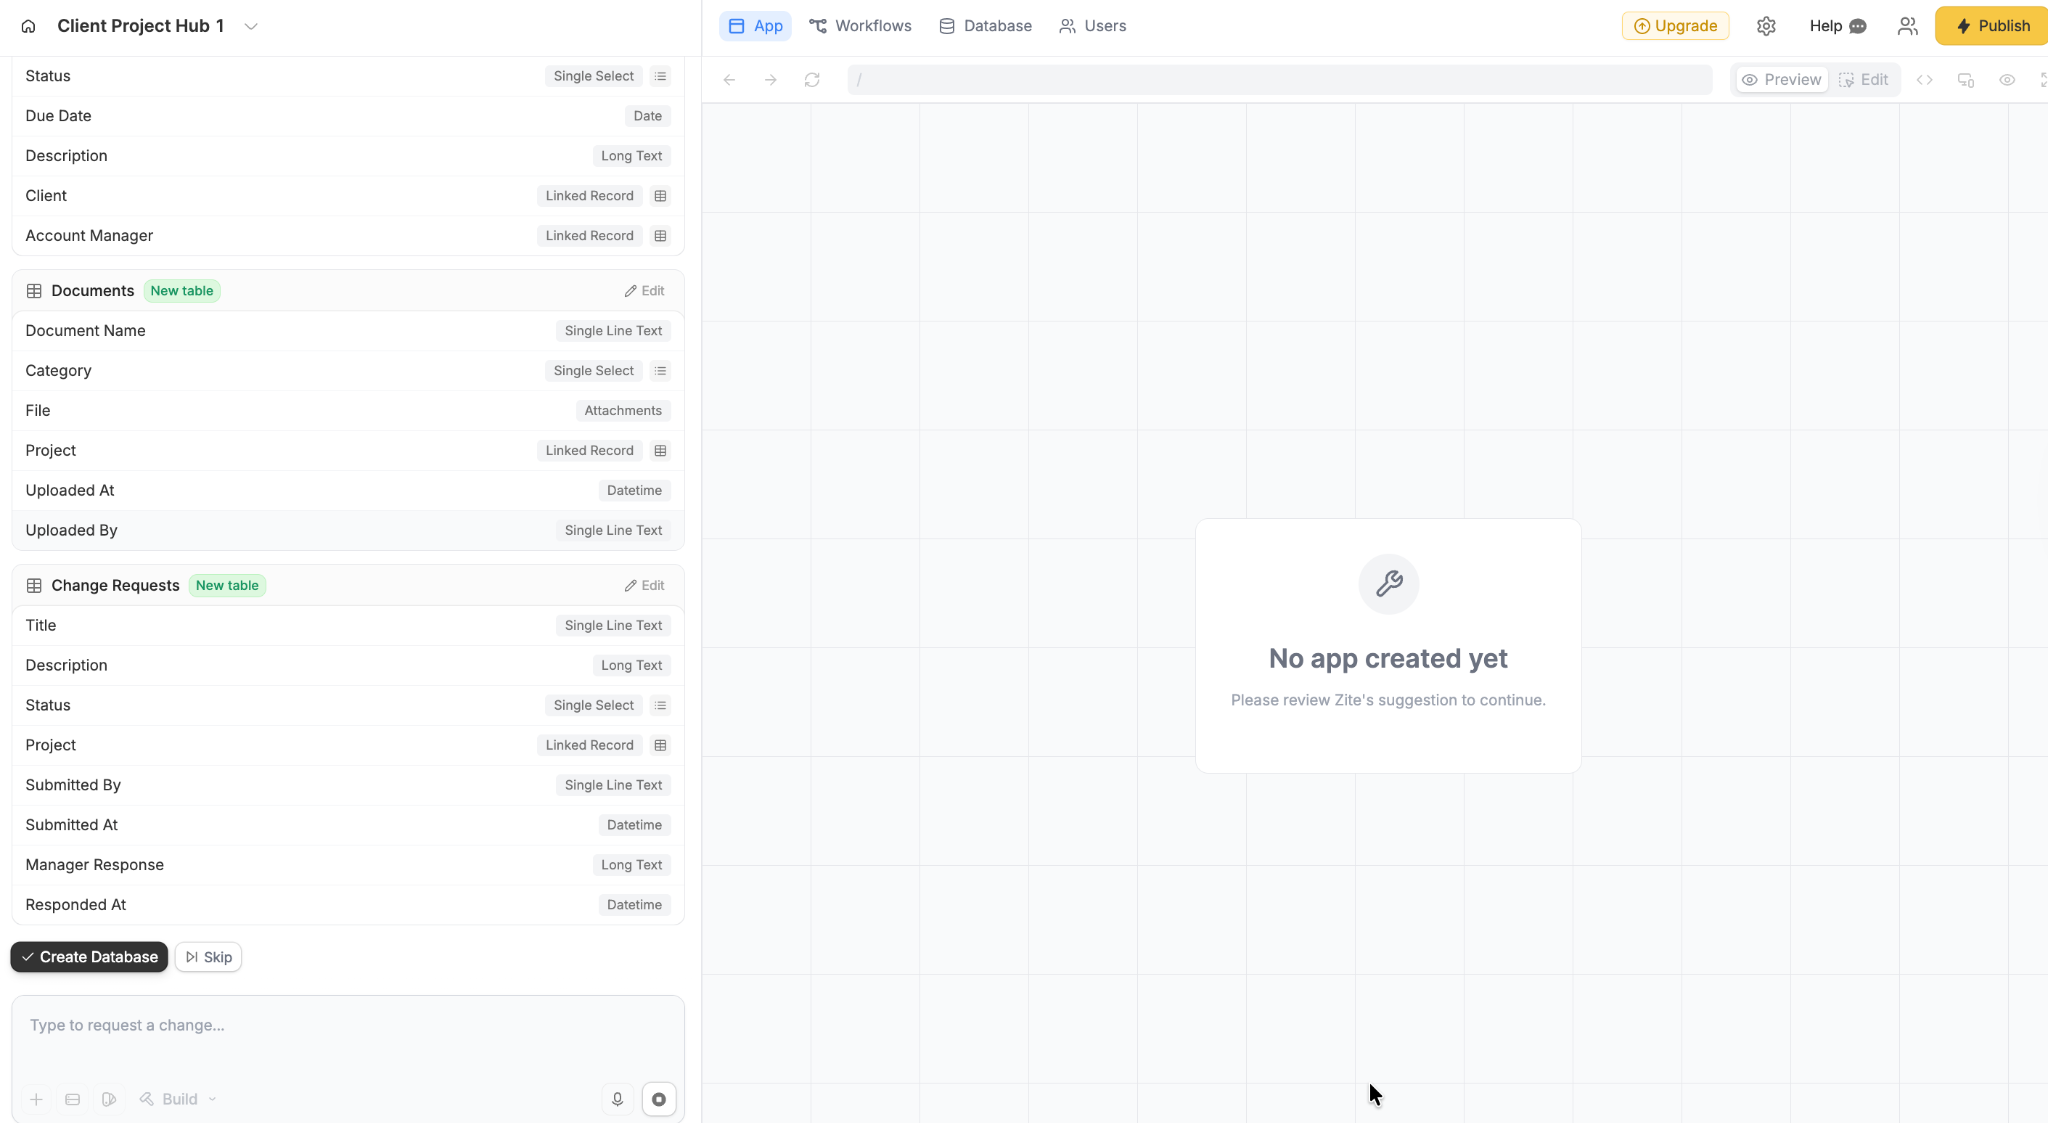
If you spot something wrong (a missing field, an incorrect data type, a table you don't need), use the "Type to request a change..." box at the bottom to tell Zite what to adjust. It will regenerate the proposal. When the structure looks right, click Create Database.
Zite then builds the full app on top of the approved database. This takes a minute or two.
Step 3: Review the generated app and workflows
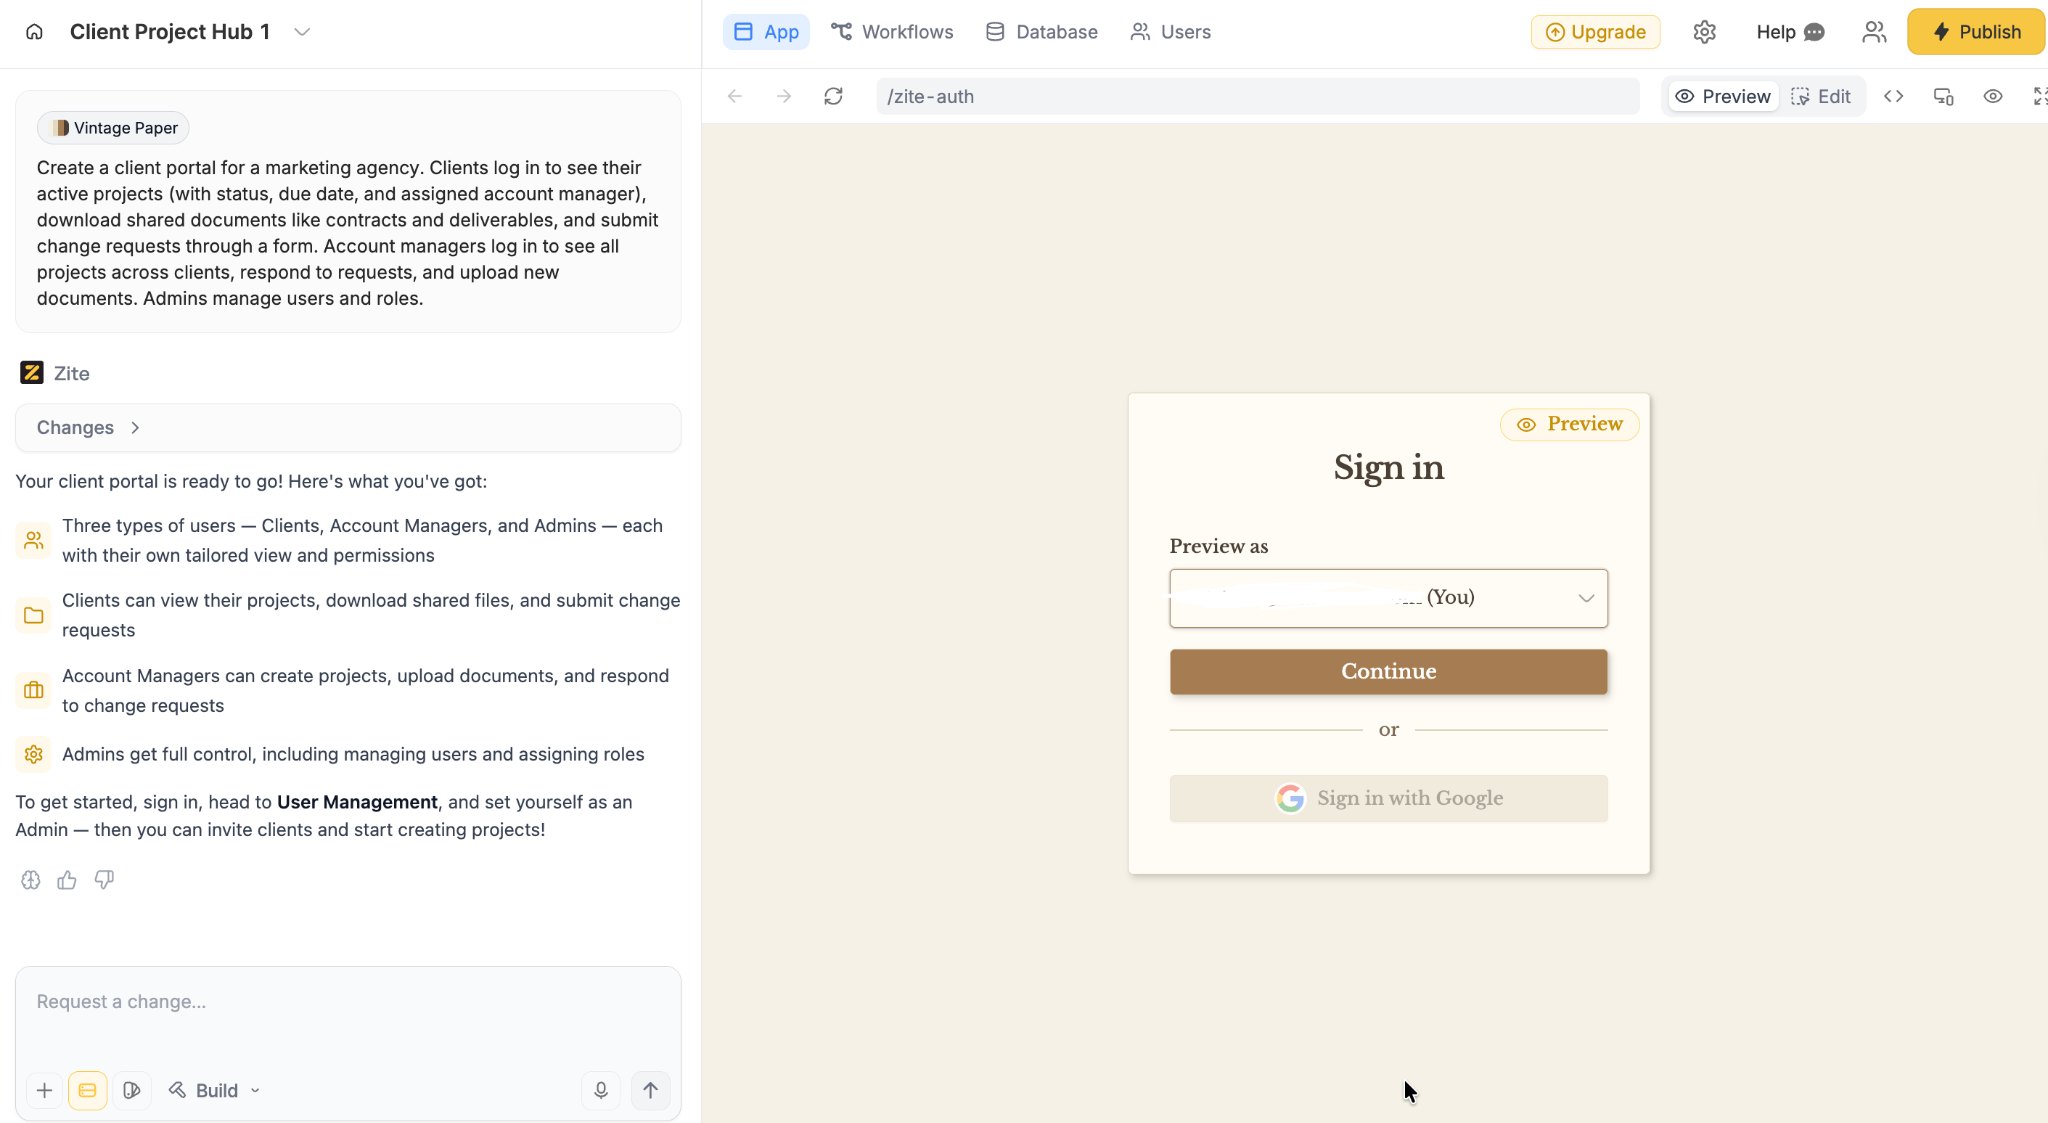
Once the build finishes, you land on the app view. Zite summarizes what it built in the left panel and shows a preview of the live app on the right. For this client portal, the preview opens on the sign-in page with the theme Zite picked (mine was "Vintage Paper").
Before inviting anyone, review the workflow logic Zite generated. Click the Workflows tab in the top navigation.
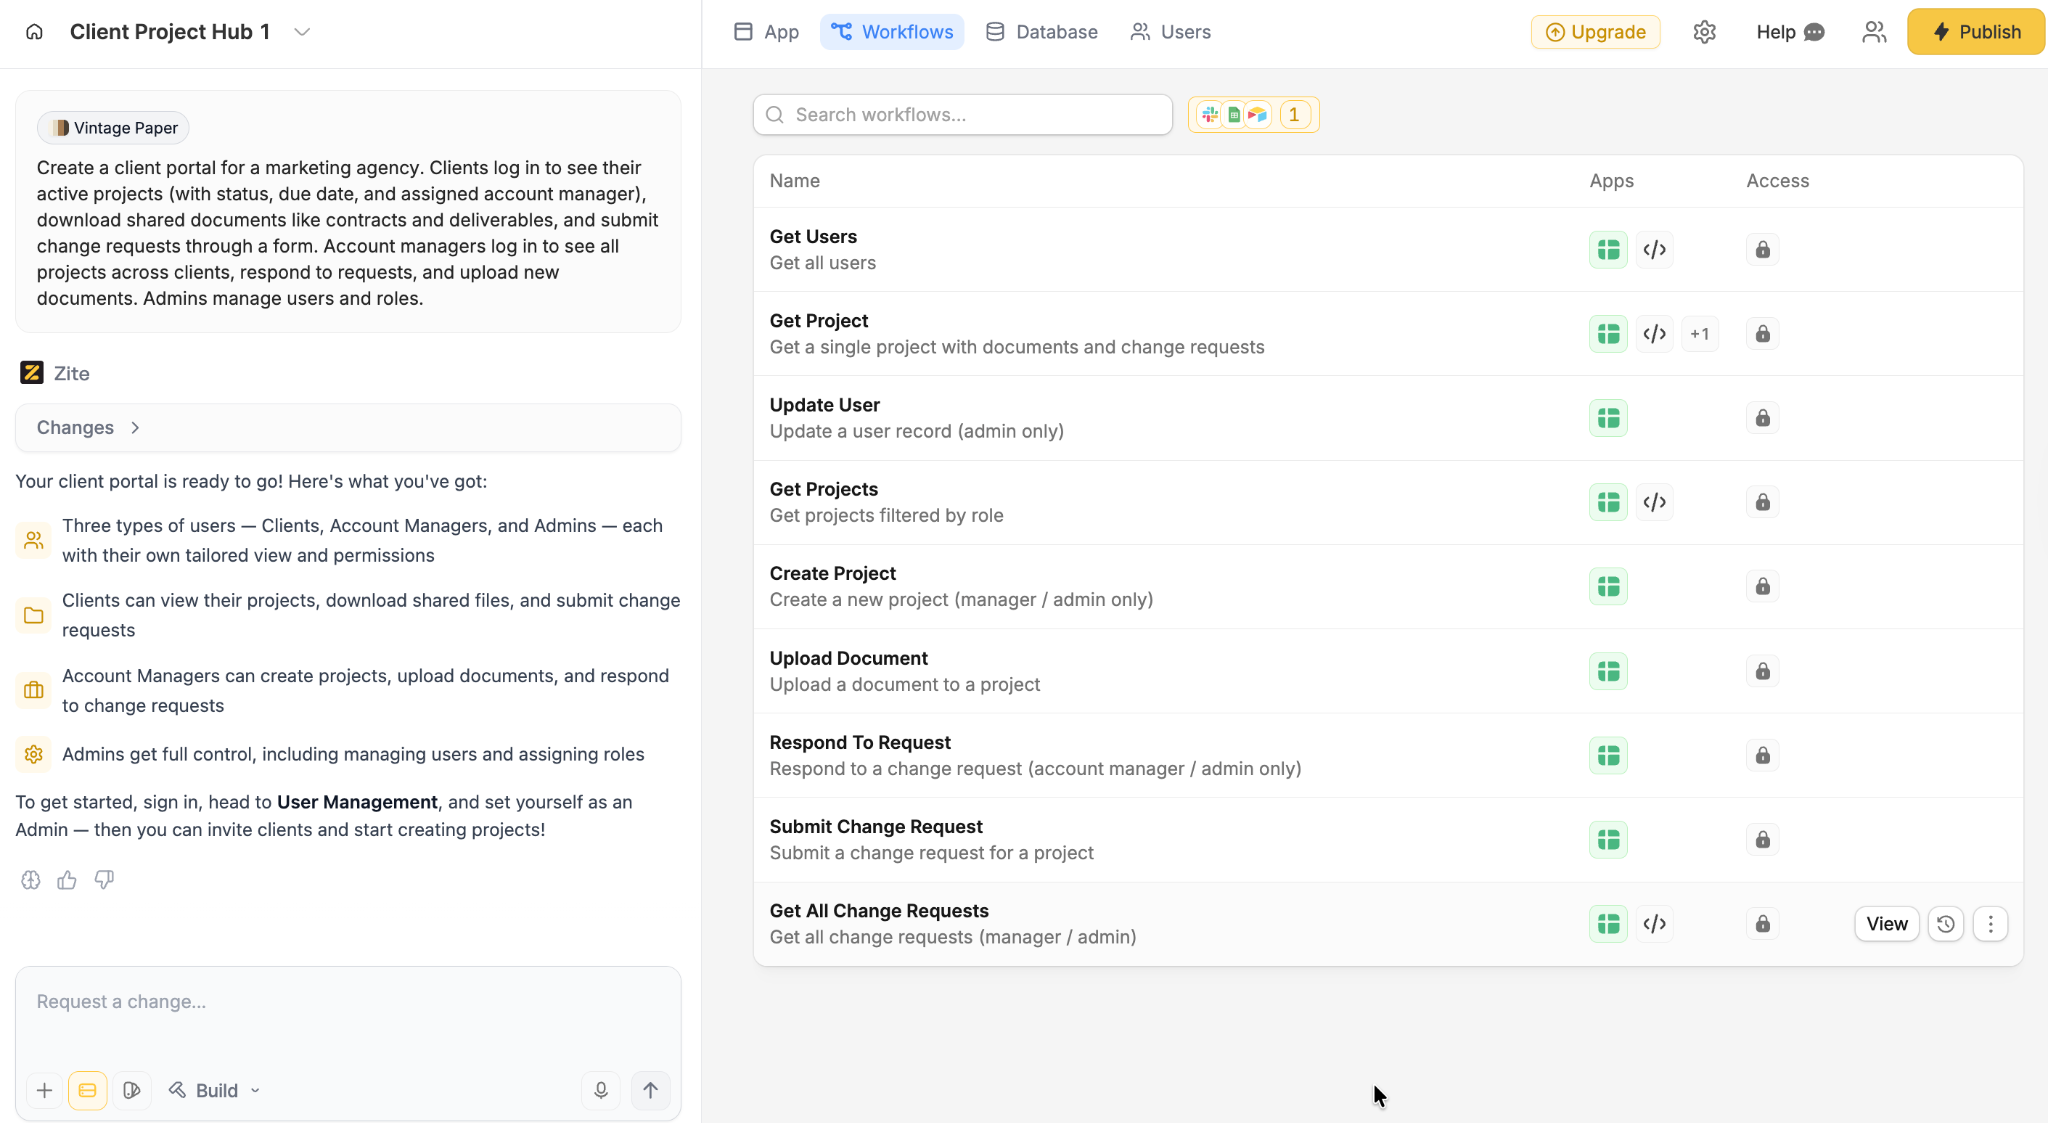
From my prompt, Zite generated nine workflows covering everything from user management and project creation to document uploads and change request handling.
Each one shows which role can run it (admin only, manager/admin, and so on), which confirms Zite respected the permissions from the prompt.
Click into any workflow to see the visual flowchart. Get All Change Requests is a good example of what Zite builds automatically:
The visual editor is for inspection and troubleshooting, not manual drag-and-drop building. If a workflow isn't firing the way you expect, click History at the top of the workflow to see past runs with inputs and outputs at each step. You can also type "why is this workflow failing?" in the chat box, and Zite will walk through the logic with you.
Spend a few minutes reviewing the workflows most relevant to your portal (for a client portal, that's Submit Change Request, Respond To Request, and Get All Change Requests). If anything looks off, use the "Request a change..." box at the bottom of the left panel to ask Zite to adjust it.
Step 4: Configure permissions and publishing
Zite automatically selects the access mode based on what you're building. A client portal that needs external login is treated differently from an internal admin tool.
For this walkthrough, Zite set up external login since clients need to sign in from outside your organization. You can adjust either way at any point through the share settings.
Open the Users tab in the top navigation to see and manage the three roles Zite generated from the prompt:
- Admin: full access to all tables, pages, and user management.
- Account Manager: view and edit all projects, respond to change requests, and upload documents.
- Client: view only their own projects and documents, submit change requests.
Review what each role can see and do. Permissions are built into the workflows, too, so a client can't accidentally see another client's data. The access rules apply to both what pages someone sees and which records load on those pages.
For the client-facing side, the external login flow is already wired up since Zite recognized this as a client portal. Invite clients by email. They can sign in through Google or email, and they only see records linked to their client ID.
Step 5: Brand it and connect your existing tools
Once the structure is right, customize three things:
- Branding kit: if you didn't already pick a brand when starting the app, enter your company website URL in the settings.
Zite automatically pulls your colors, fonts, and logo, so the portal feels like a real part of your business rather than a generic third-party tool. That trust signal matters most for portals where clients are logging in for the first time.
- Visual editing: click any page element to change labels, layouts, or page copy directly. Non-technical teammates can update onboarding copy or swap a header image without re-prompting the AI.
- Native integrations: in the apps panel, connect Slack (so new requests post to a team channel), Google Sheets (to sync client records from an existing source), or OpenAI (for AI-drafted responses to incoming requests).
The portal can also do things, not just show information. When a client submits a new change request, Zite can automatically send a confirmation email and ping the account manager in Slack.
Step 6: Test with real users
Before opening the portal to real clients, hand it to two or three people from your target audience. Ask them to complete a specific task: "Log in, find the most recent contract for your account, and submit a request to schedule a kickoff call."
Watch where they get stuck. Fix the top friction points before wider rollout. Most of the issues I catch at this stage are label changes ("Change Requests" renamed to "Submit a request") or missing confirmation states after form submission. Small adjustments now prevent confusion at scale later.
Step 7: Share and publish
Click Share in the top right of the Zite interface. You get a sharing panel with everything needed to take the portal live.
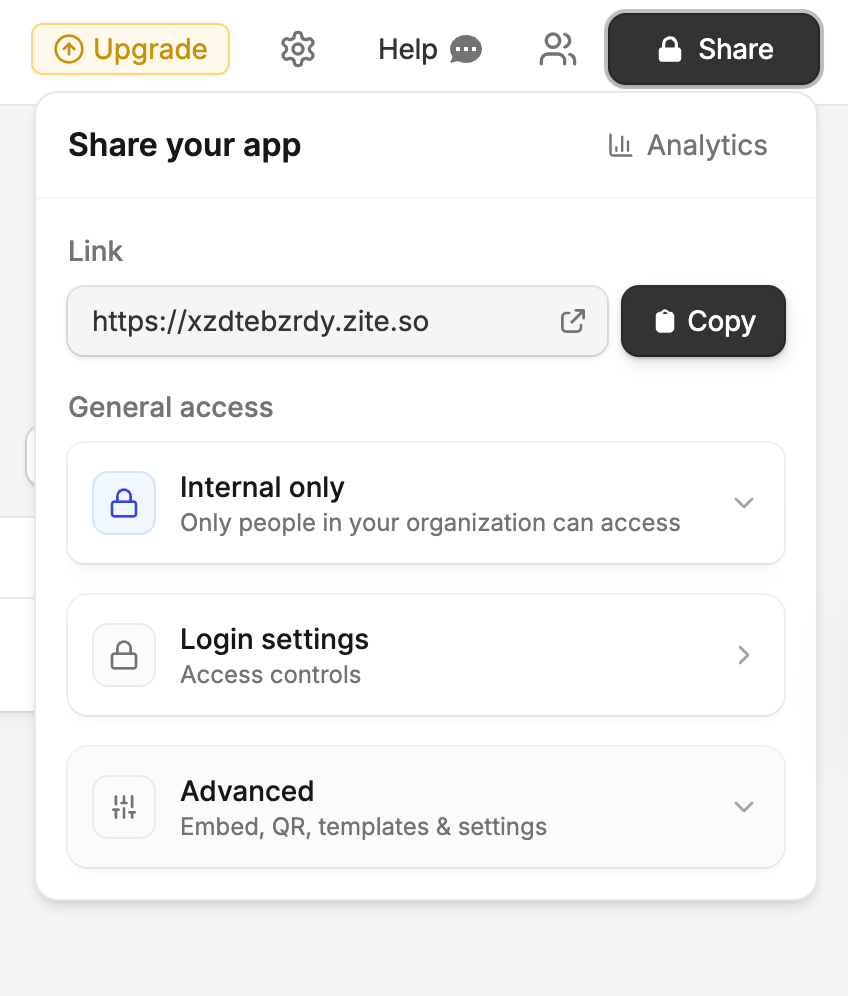
The panel has three things to review before you invite anyone:
- Link: Zite generates a subdomain like yourportal.zite.so by default. You can copy it for testing, or use the settings to connect a custom domain like clients.youragency.com once you're ready.
- General access: pick whether the portal is internal-only (restricted to your Zite organization) or public (external clients can log in). For a client portal, you'll switch this to public and configure client login.
- Advanced: embed the portal on your public website, generate a QR code, or export the portal as a template.
Share the portal with clients through:
- Direct link: send the URL by email when onboarding new clients.
- Embed: add a "Client Login" button on your agency's public website that opens the portal.
- Invitations: invite clients from inside Zite. They get a branded email with login instructions.
Once the portal is live, track adoption: logins per client per week, time to submit a request, and the volume of requests coming through the portal versus email. Plan a monthly content review for the first quarter and assign one person to own updates.
Client portal prompt template (copy and use)
The short prompt in Step 1 is enough to get a working portal. This template is for teams who want more control over what Zite generates, like specific pages, fields, or permission rules. Copy it into Zite and swap the details to match your setup.
Portal title: [Company] Client Portal
Primary job: [One sentence, e.g., "Give clients self-service access to project status, documents, and requests without emailing back and forth."]
Audience and roles: Clients, account managers, admins
Top navigation: Dashboard, Projects, Documents, Requests, Account
Core pages:
Data model:
Permissions: Admin (full access), Account manager (view and edit all projects and requests), Client (view own projects and documents, submit requests)
Acceptance criteria: Clients see only their own records. New requests notify the assigned account manager. Document preview works for PDF and DOCX. Search returns relevant results in under one second.
Common mistakes to avoid
Portal projects tend to fail in the same few ways:
- Packing in too many features: a portal that tries to replace every tool on day one ships late and confuses users. Start with the top-priority job and expand based on usage data.
- Skipping the permissions plan: granting everyone full access is fast but creates problems the moment sensitive data lands in the portal. Define roles before building pages, not after.
- Ignoring mobile: clients check project status from their phones. Test search and the request form on mobile before launch.
- Building without a content owner: portals with outdated information lose trust fast. Assign one person to own content accuracy from day one.
- Choosing a platform before defining the job: the tool should match the portal's requirements, not the other way around. Write the prompt in Step 1 before committing to anything.
Why Zite works well for portal websites
Here's the short version of what makes Zite a good fit for portals: (in case you're evaluating a few options)
- Visual workflows: AI-generated from the prompt, shown as a flowchart the team can inspect and trace. Permission checks and role-based branching are built in.
- Built-in database: AI fields, and linked records generated from the prompt, with AI Fields that can enrich data and search the web for context.
- Permissions and publishing: Zite picks the access mode based on what you're building, with role-based access on every plan. Publishable to the web when clients or partners need external access.
- Branding kit: reads your website URL and automatically extracts colors, fonts, and styling.
- Native integrations: Airtable, Google Sheets, Slack, and OpenAI. Email notifications and Stripe payments work as workflow actions.
- Flat pricing: unlimited users and apps on every plan, including free. Paid plans start at $19/month. No per-seat pricing, so rolling the portal out to 10 clients or 500 costs the same.
Two honest limitations. No code export, so the portal stays hosted on Zite. And the template library is still growing compared to established intranet platforms, so early setup leans more on prompts than pre-made layouts.
If you want to compare Zite directly with other AI builders, there are side-by-side breakdowns with Lovable, Base44, and Replit.
Ready to Try Zite?
If you’re building a portal website that your team needs to trust and update long-term, Zite is worth trying. The free plan includes unlimited apps and users, no credit card required.
Frequently asked questions
How long does it take to create a portal website?
Creating a portal website takes 2 to 5 days for a basic version with authentication and core pages using a no-code builder. A full production launch with integrations, workflows, and governance takes 3 to 8 weeks.
How much does it cost to build a portal website?
Building a portal website costs anywhere from $0 to $50,000+, depending on the path you take. AI-powered platforms like Zite build a custom portal from a plain-language prompt, with paid plans starting at $19/month. Agency or in-house development usually starts around $15,000 and climbs based on features, integrations, and timeline.
Can I create a portal website without coding?
Yes, you can create a portal website without coding using no-code platforms like Zite that generate the portal, database, and workflows from natural language prompts. No programming skills are required.
What features does a portal website need?
A portal website needs secure login with role-based access, a database to store and display content, search, user-request forms, and integrations with existing tools. Document storage and notification workflows are also common requirements.
What is the difference between a website and a portal website?
The difference between a website and a portal website is access and personalization. A website shows the same public content to everyone. A portal website requires login and delivers different content based on the user’s role, permissions, and relationship to the organization.
Should I build or buy a portal website?
Building a portal website with a no-code tool gives more flexibility and lower ongoing costs than buying off-the-shelf portal software. Off-the-shelf works when your needs are standard. Build when you need custom workflows, branded experiences, or control over permissions and data.