> ## Documentation Index
> Fetch the complete documentation index at: https://zite.com/llms.txt
> Use this file to discover all available pages before exploring further.
# Scheduled Workflows
> Run Zite workflows automatically at a future time or on a recurring schedule.
Scheduled workflows let your app run work later without someone manually starting each run. Use them for recurring summaries, scheduled reports, reminder emails, follow-ups, cleanup jobs, and other time-based actions.
Scheduled workflows are a Business plan feature. If you downgrade after creating schedules, existing schedules keep running, but you need to upgrade again before creating new schedules.
## Types of schedules
Zite supports two common schedule patterns:
| Schedule type | Created by | Best for |
| -------------------- | ---------------------------------------------------------- | ---------------------------------------------------------------------------------- |
| **Editor schedules** | You create the schedule while building the app. | Recurring jobs such as weekly ticket summaries, daily reports, or monthly digests. |
| **In-app schedules** | A user creates the schedule from inside the published app. | User-specific reminders, follow-ups, and one-time tasks based on app activity. |
You can create an editor schedule in chat, or create one manually from the `Schedules` tab in `Workflows`. Click `Create scheduled task`, then describe what should run and when. For example, you can ask Zite to email a summary of open tickets every Monday at 9:00 AM.
You can also build a button in your app that lets a user set a reminder for three days from now.
## Create a scheduled workflow
**Describe the schedule**
In the chat editor, tell Zite what should happen and when it should run.
```text theme={null}
Every Monday at 9:00 AM, email me a summary of open support tickets.
```
Zite understands your current time and timezone when interpreting prompts like "Monday at 9:00 AM." If you want a different timezone, include it in the prompt.
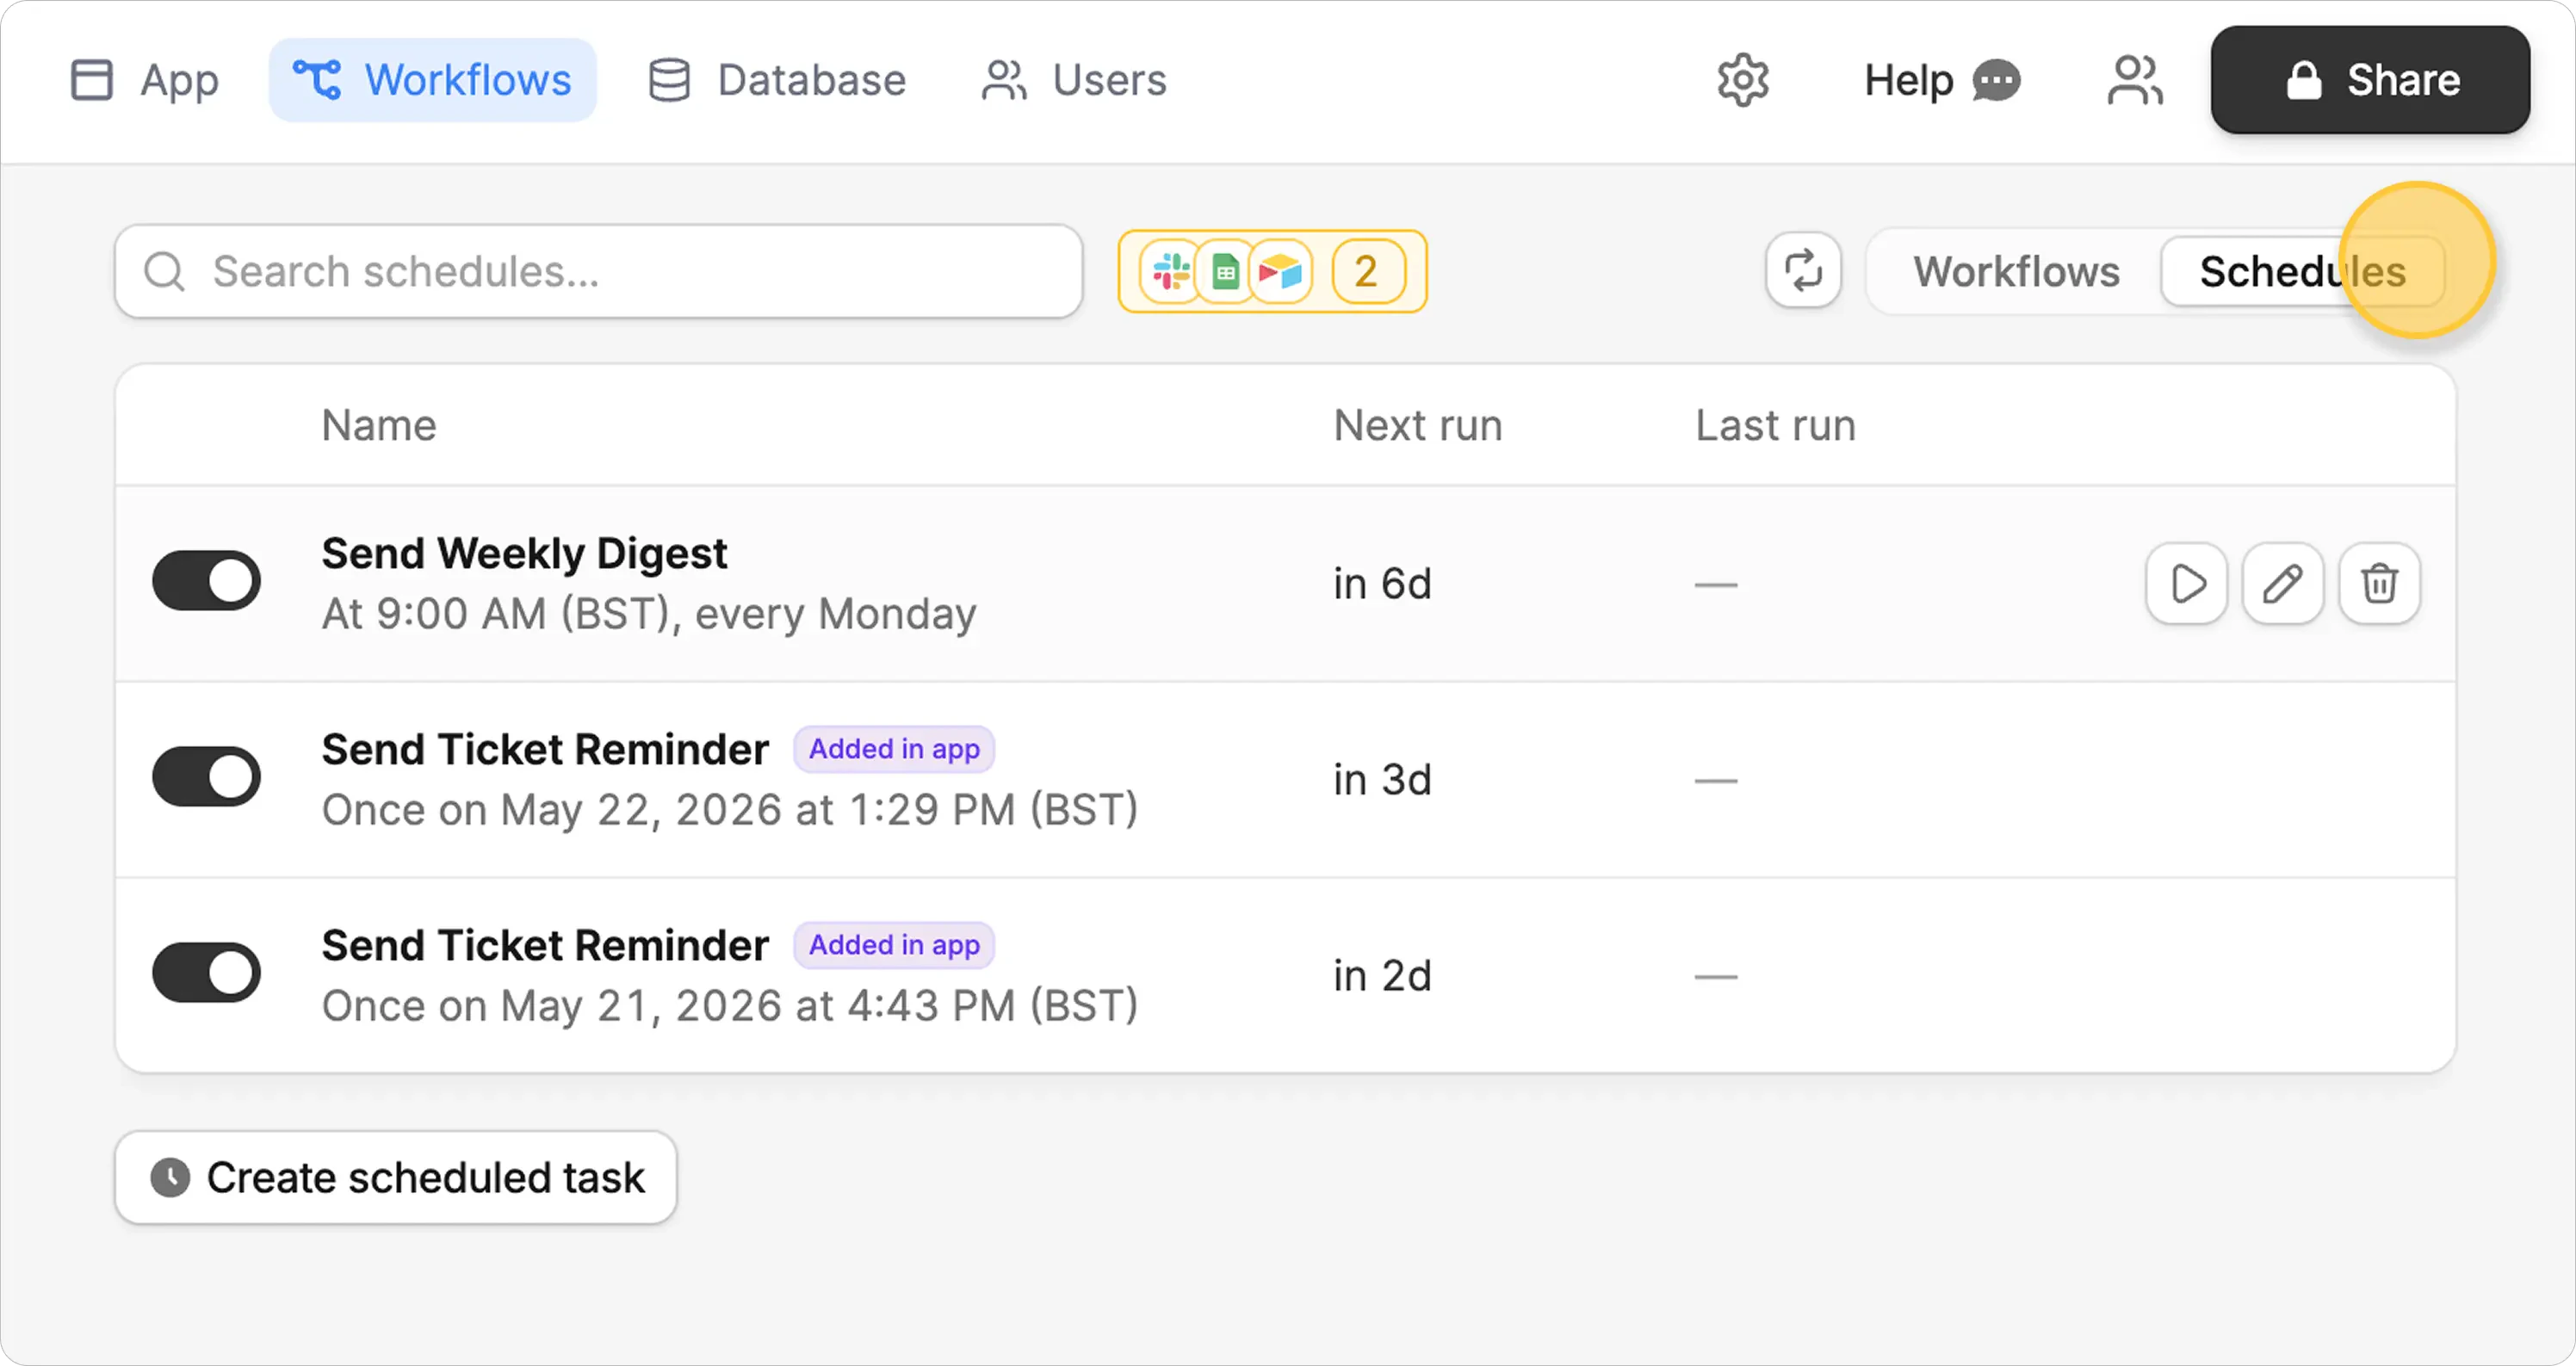
**Review the generated workflow**
Zite creates the workflow and attaches a schedule to it. Open `Workflows`, then use the toggle on the right side to switch from `Workflows` to `Schedules`. This view shows scheduled tasks, their source, next run, and current status.
 **Publish the app**
Schedules created in the editor do not run until the app is published. If you see an unpublished warning, publish the app before expecting the schedule to run.
## Create user triggered schedules
You can also build app interactions that create schedules for the current user. For example, a support ticket app can include a `Set reminder` button that emails the assigned teammate in three days.
In-app schedules are useful when:
* the schedule depends on a user action
* the schedule should use the current user's app context
* each user or record may need a different reminder time
* the task should be one-time instead of recurring
Schedules created this way appear in the `Workflows` view as in-app schedules, so you can distinguish them from schedules you created in the editor.
## Manage scheduled workflows
After a schedule exists, use these controls to adjust when it runs, test it, pause it, or remove it.
| Action | What it does |
| ---------------- | ------------------------------------------------------------------------------------------------------------------ |
| **Edit** | Change whether the schedule is one-time or recurring, update the time, add multiple run times, or set an end date. |
| **Edit with AI** | Describe the new timing in plain language, such as "make this run every Sunday at 9 AM." |
| **Pause** | Stop future runs without deleting the schedule. |
| **Remove** | Delete the schedule when it should no longer run. |
| **Run now** | Trigger the workflow immediately with test data so you can confirm the workflow works. |
When you edit or pause a schedule that was created in the editor, publish the app for the change to take effect.
## Check run history
Open a workflow and go to `History` to see past runs. Run history helps you confirm whether a schedule fired, whether it succeeded, and what triggered it.
**Publish the app**
Schedules created in the editor do not run until the app is published. If you see an unpublished warning, publish the app before expecting the schedule to run.
## Create user triggered schedules
You can also build app interactions that create schedules for the current user. For example, a support ticket app can include a `Set reminder` button that emails the assigned teammate in three days.
In-app schedules are useful when:
* the schedule depends on a user action
* the schedule should use the current user's app context
* each user or record may need a different reminder time
* the task should be one-time instead of recurring
Schedules created this way appear in the `Workflows` view as in-app schedules, so you can distinguish them from schedules you created in the editor.
## Manage scheduled workflows
After a schedule exists, use these controls to adjust when it runs, test it, pause it, or remove it.
| Action | What it does |
| ---------------- | ------------------------------------------------------------------------------------------------------------------ |
| **Edit** | Change whether the schedule is one-time or recurring, update the time, add multiple run times, or set an end date. |
| **Edit with AI** | Describe the new timing in plain language, such as "make this run every Sunday at 9 AM." |
| **Pause** | Stop future runs without deleting the schedule. |
| **Remove** | Delete the schedule when it should no longer run. |
| **Run now** | Trigger the workflow immediately with test data so you can confirm the workflow works. |
When you edit or pause a schedule that was created in the editor, publish the app for the change to take effect.
## Check run history
Open a workflow and go to `History` to see past runs. Run history helps you confirm whether a schedule fired, whether it succeeded, and what triggered it.
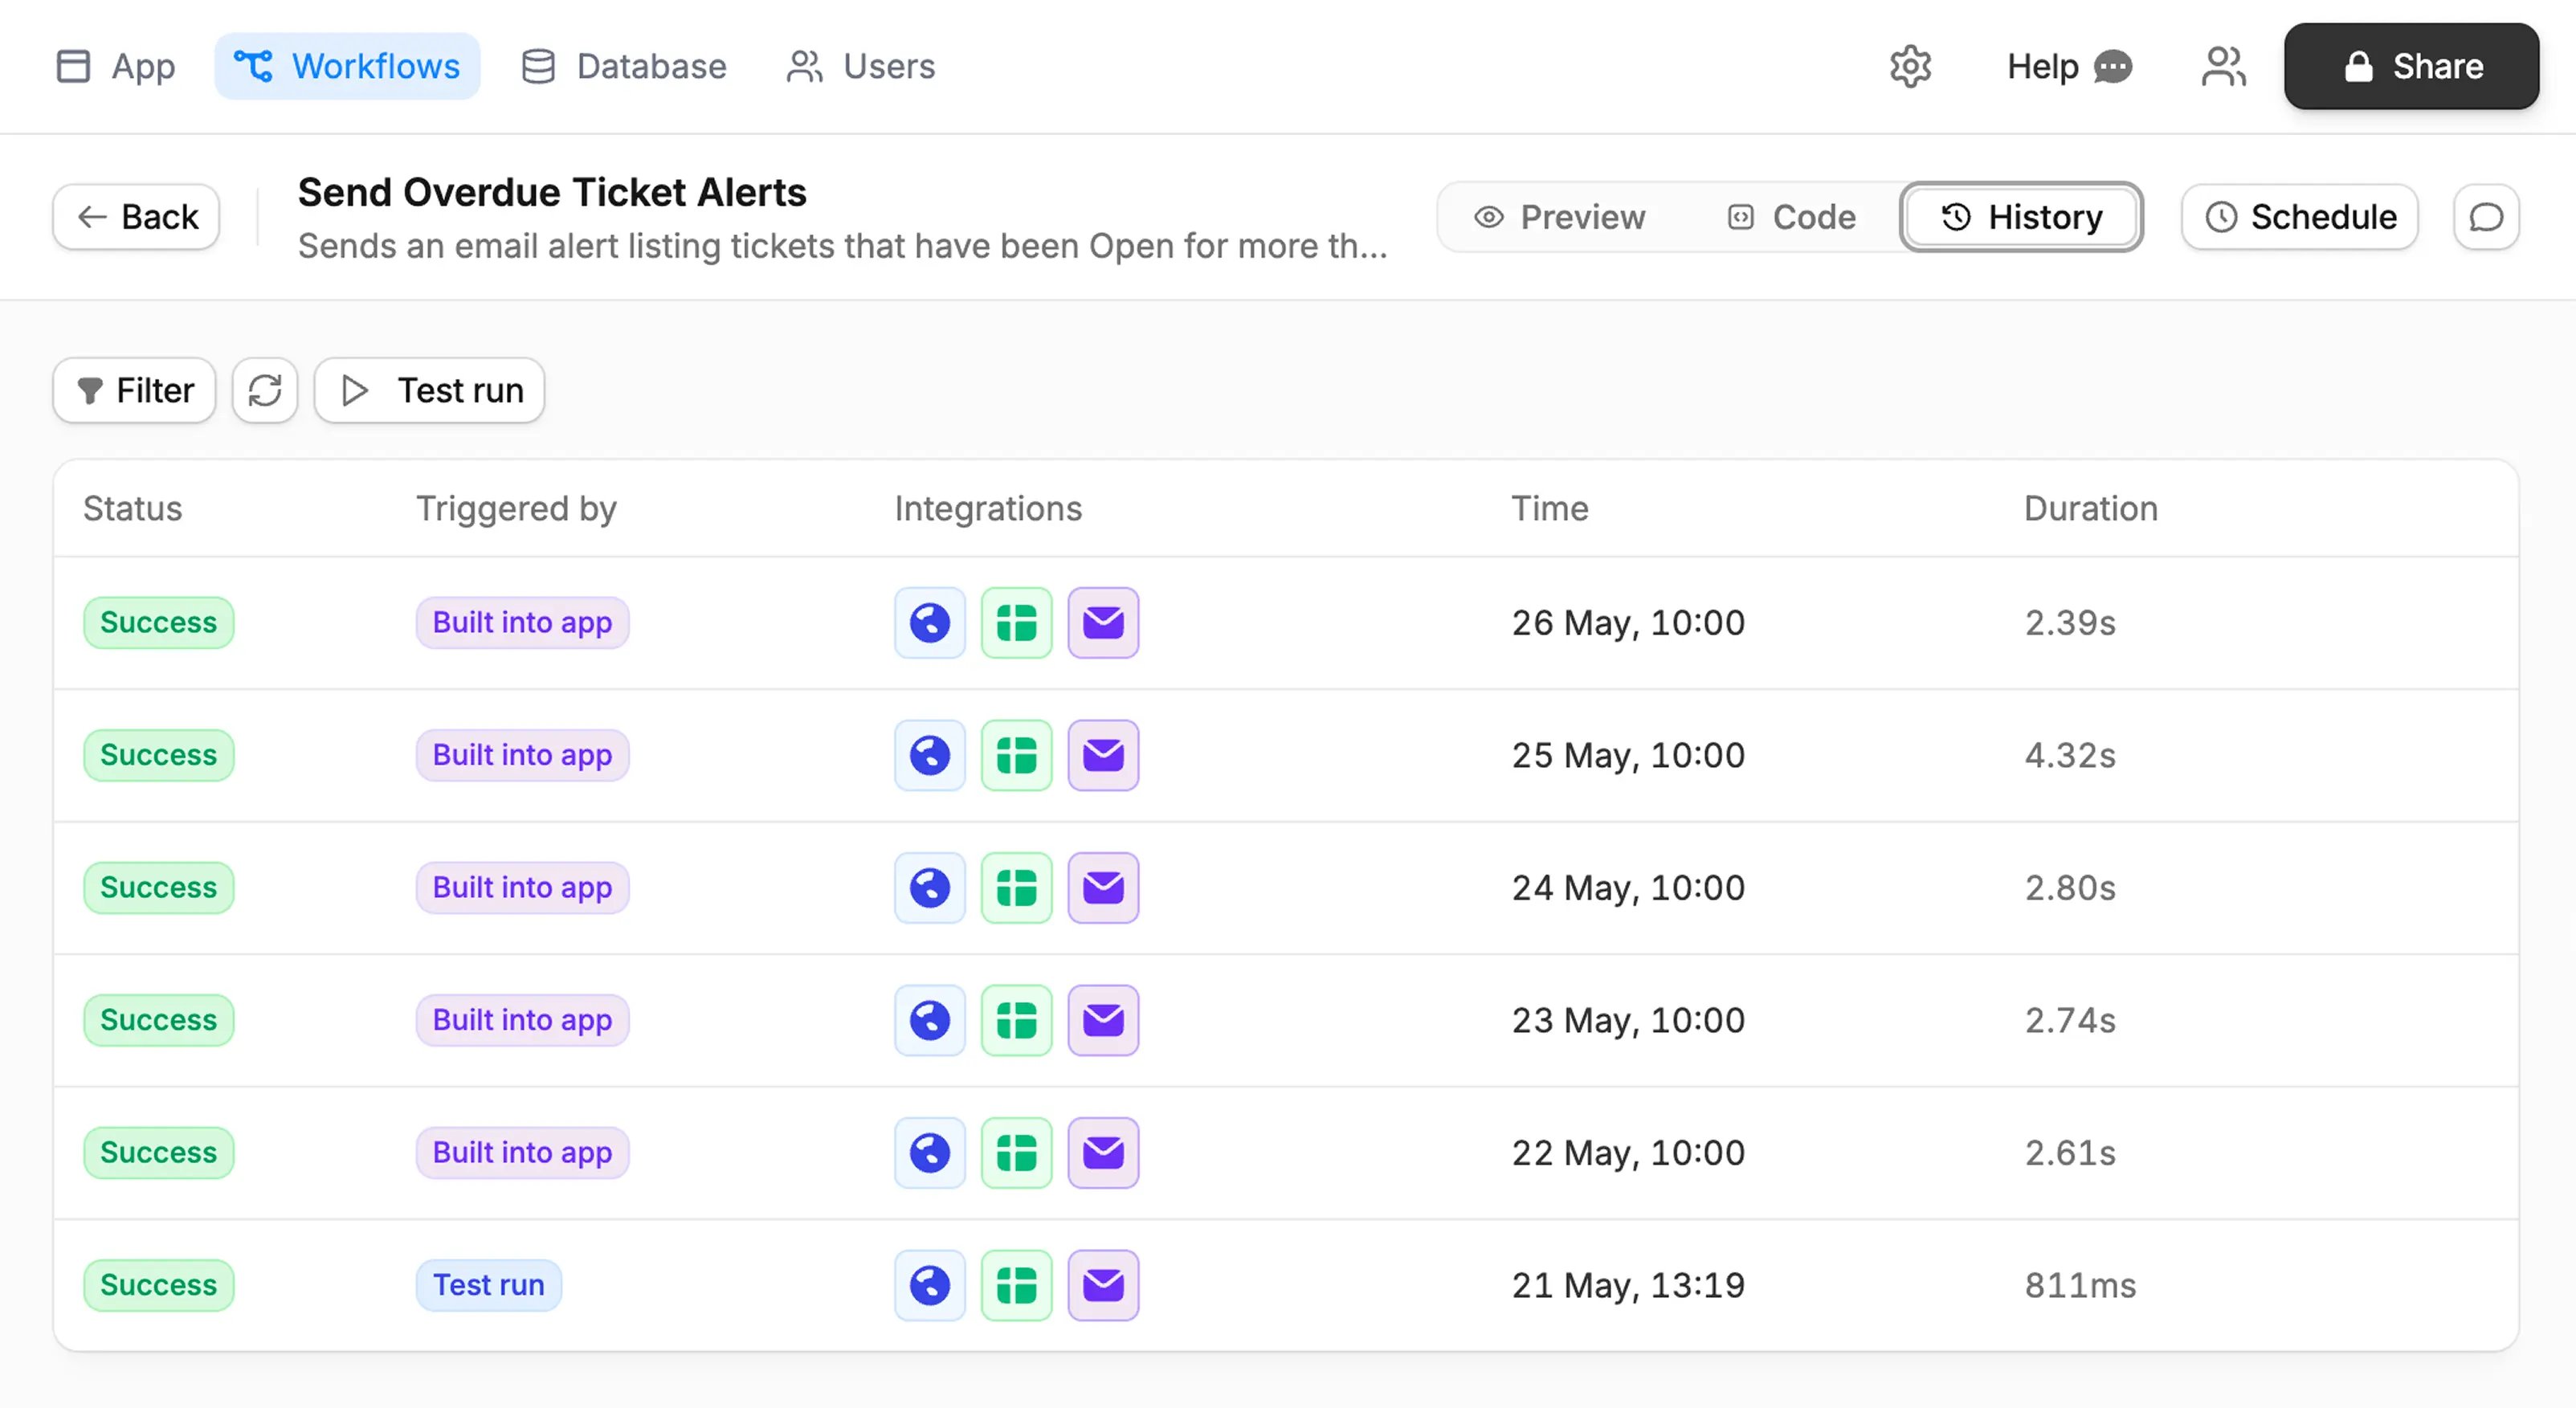 Run history can include different trigger sources, such as:
* scheduled runs
* test runs from `Run now`
* runs triggered from inside the app
Use filters to narrow the history to the run type, status, or source you want to inspect. Click a run to see details such as when it happened, whether it succeeded, and the workflow context used for that run.
## Example prompts
**Weekly ticket summary**
```text theme={null}
Every Monday at 9:00 AM, email me a summary of open tickets
grouped by priority.
```
**Monthly report**
```text theme={null}
On the first day of every month at 8:00 AM, send the operations
team a report of overdue tasks and completed tasks from the
previous month.
```
**In-app reminder**
```text theme={null}
Add a Set reminder button to each ticket. When a user clicks it,
schedule an email reminder to that user three days later with the
ticket title and status.
```
**Follow-up sequence**
```text theme={null}
When a lead is marked Interested, schedule a follow-up email for
two days later with the lead owner, status, and suggested next step.
```
## FAQs
Yes. You need a Business plan to create new scheduled workflows. If you downgrade after creating schedules, existing schedules keep running, but you cannot create new schedules until you upgrade again.
Editor schedules do not run until the app is published. If you edit or pause an editor-created schedule, publish the app for the change to take effect.
Zite uses your current time and timezone unless you specify another one. For example, "every Monday at 9:00 AM" is interpreted in your timezone.
Yes. In-app schedules can include context about the app user who created them, which is useful for user-specific reminders and follow-ups.
Open the workflow and go to `History`. Run history shows whether the schedule fired, whether it succeeded, and the workflow context used for that run.
Run history can include different trigger sources, such as:
* scheduled runs
* test runs from `Run now`
* runs triggered from inside the app
Use filters to narrow the history to the run type, status, or source you want to inspect. Click a run to see details such as when it happened, whether it succeeded, and the workflow context used for that run.
## Example prompts
**Weekly ticket summary**
```text theme={null}
Every Monday at 9:00 AM, email me a summary of open tickets
grouped by priority.
```
**Monthly report**
```text theme={null}
On the first day of every month at 8:00 AM, send the operations
team a report of overdue tasks and completed tasks from the
previous month.
```
**In-app reminder**
```text theme={null}
Add a Set reminder button to each ticket. When a user clicks it,
schedule an email reminder to that user three days later with the
ticket title and status.
```
**Follow-up sequence**
```text theme={null}
When a lead is marked Interested, schedule a follow-up email for
two days later with the lead owner, status, and suggested next step.
```
## FAQs
Yes. You need a Business plan to create new scheduled workflows. If you downgrade after creating schedules, existing schedules keep running, but you cannot create new schedules until you upgrade again.
Editor schedules do not run until the app is published. If you edit or pause an editor-created schedule, publish the app for the change to take effect.
Zite uses your current time and timezone unless you specify another one. For example, "every Monday at 9:00 AM" is interpreted in your timezone.
Yes. In-app schedules can include context about the app user who created them, which is useful for user-specific reminders and follow-ups.
Open the workflow and go to `History`. Run history shows whether the schedule fired, whether it succeeded, and the workflow context used for that run.
Related topics