
You don’t need a PhD, a data science team, or weeks of setup to develop an AI app. With no-code, AI app builders like Zite, you can turn plain-language descriptions into working AI apps in minutes. Below are the exact steps I use to go from idea to a deployed AI app without writing code.
What is an AI app?
An AI app is software that uses artificial intelligence to automate repetitive tasks, process data, and make decisions that would otherwise require manual work. For example, generating summaries from form submissions or automatically routing client portal requests to the right team.
A few years ago, building such an app felt out of reach unless you had a technical background. You had to understand programming languages, models, algorithms, and infrastructure just to get a prototype running.
That’s no longer the case.
Today, instead of writing code line by line, you explain what the app should do and what data it should work with. AI generates the app from that description.
Here are some top examples of what you can automate with an AI app:
- Support ticket routing: Have AI assign tickets to the right team member the moment they arrive.
- Lead qualification: Let AI score and categorize leads so your sales team focuses on the best ones.
- Document processing: Automatically extract details from uploads to fill your database.
- Content generation: AI can draft replies, summarize reports, or write documentation for you.
- Approval workflows: AI pre-screens requests, so your team can focus only on the most important cases.
What you'll need before starting
Prerequisites:
- Zite account: Create a free Zite account or log in to your existing account.
- OpenAI API key (optional): If you want to add AI features like text generation, data extraction, or automated responses, you can bring your own OpenAI API key. You can also use Zite’s built-in AI instead.
- Technical requirements: A web browser and an internet connection. Zite is a web-based platform. No downloads, setup, or development environment needed.
Time required: Approximately 45–60 minutes. Zite generates the core app in a few minutes. We'll spend the remaining time validating the generated AI workflow in the visual editor and testing it.
How to create an AI app for business in Zite: Step-by-step
Zite is a no-code platform that lets you build and launch production business software fast using natural language prompts.
Here’s how to create an AI app using it:
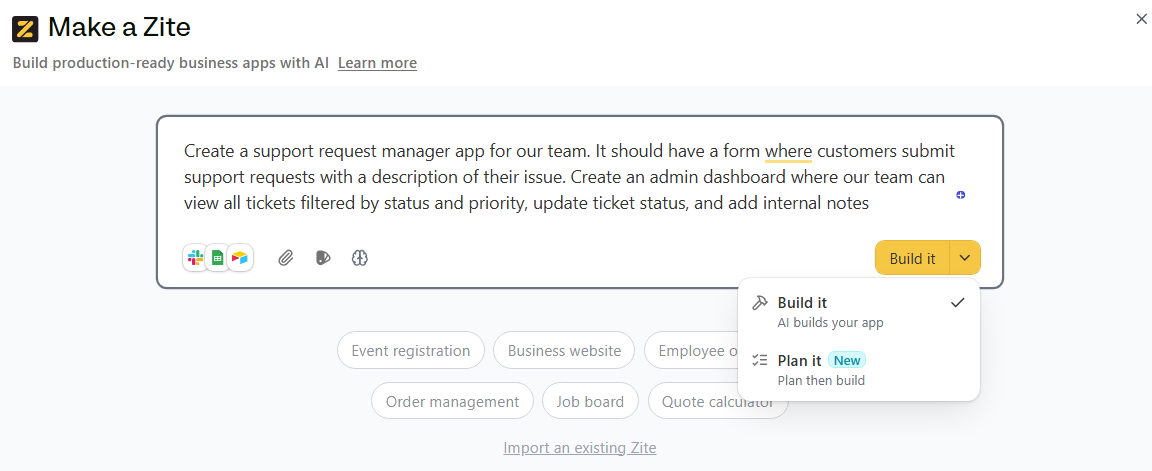
Step 1: Start a new app and describe your workflow
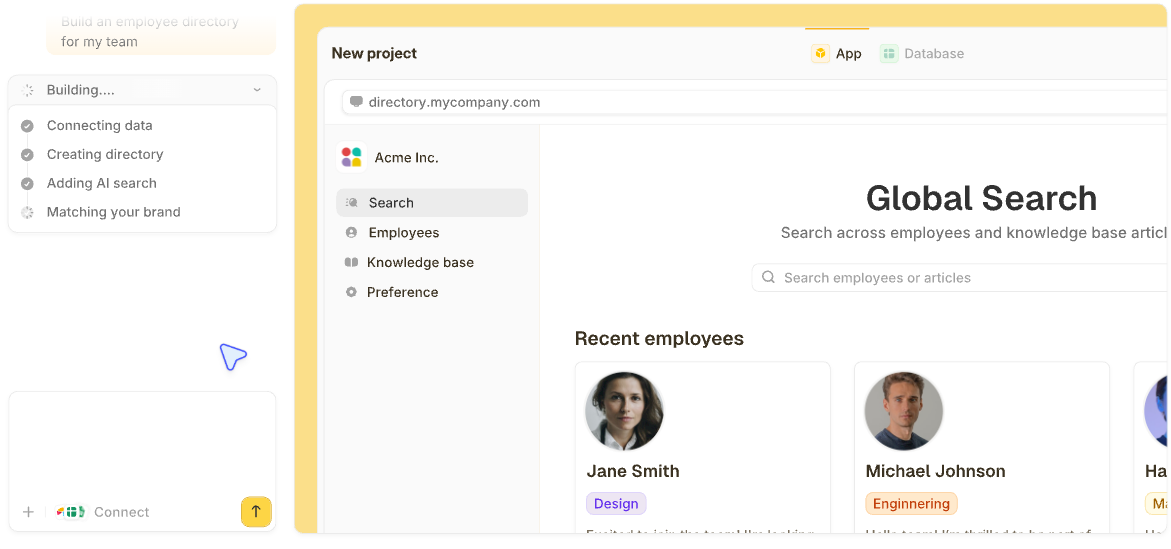
Log in to your Zite account and click Create, then select Zite from the dropdown.
In the prompt box, type a specific description of your AI app. Include what triggers the workflow, what the AI should do, and what actions follow.
For example, you might write:
"Create a support request manager app for our team. It should have a form where customers submit support requests with a description of their issue. Create an admin dashboard where our team can view all tickets filtered by status and priority, update ticket status, and add internal notes."
Then click Build it.
Zite will start generating your app.
Pro tip: If you're building a complex app, use Plan Mode first. Click the settings icon and enable Plan Mode. Zite will ask clarifying questions and create an editable plan document before building. This prevents misunderstandings and wasted iterations.
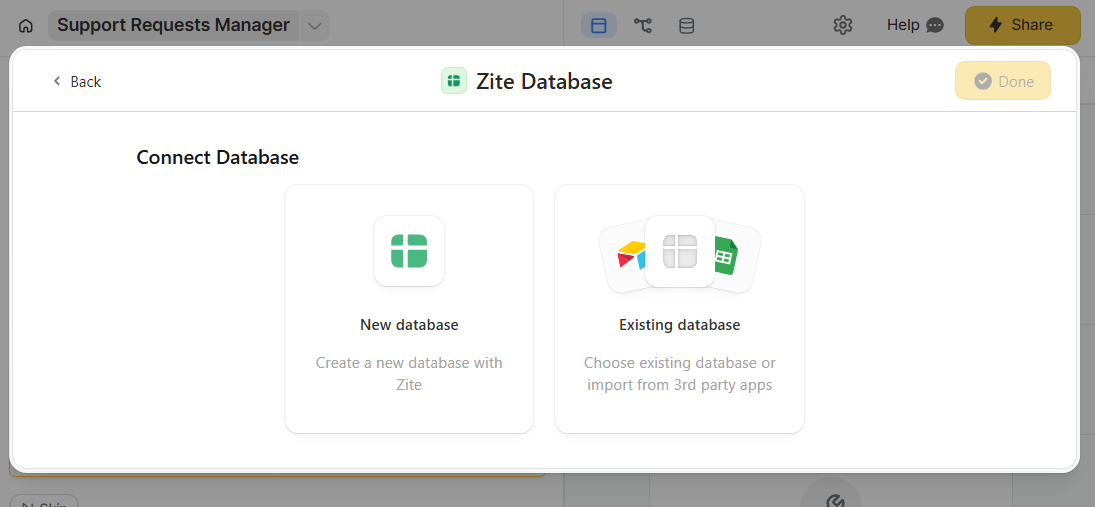
Step 2: Set up your database
Every workflow app needs a place to store data. When Zite prompts you to connect a database, choose one of the following:
- New database: Zite instantly creates all necessary tables and fields based on your description. Data lives on the platform, and you don't need to write SQL (though the database has SQL power underneath).
- Existing database: Connect an existing data source. Zite supports native integrations with Airtable and Google Sheets if you have historical data to work with.
For this walkthrough, we’ll use Zite’s built-in database.
Zite proposes tables and fields based on your prompt.
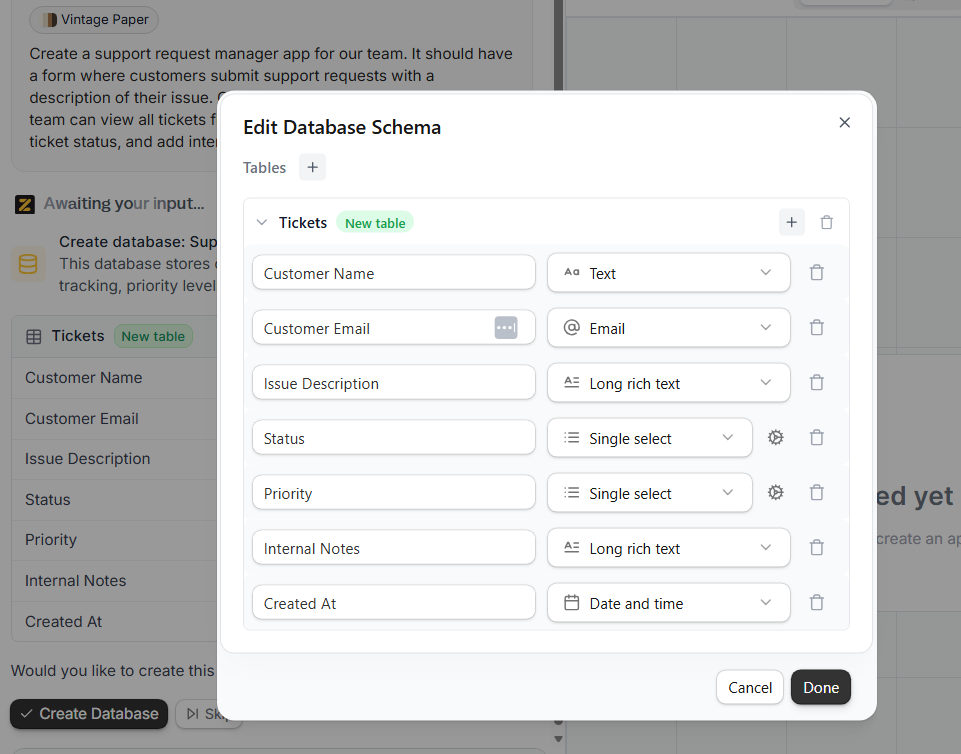
Review them, add any missing fields, and adjust names or types if needed. Then click Create Database.
Step 3: Connect OpenAI for AI-powered processing
To use AI inside your app, you first need to connect OpenAI to your Zite workspace.
In the Zite chat box, type a request like "Integrate OpenAI to analyze submission sentiment" or click the apps icon at the bottom left and select OpenAI.
Either use Zite’s account or use your own OpenAI API key.
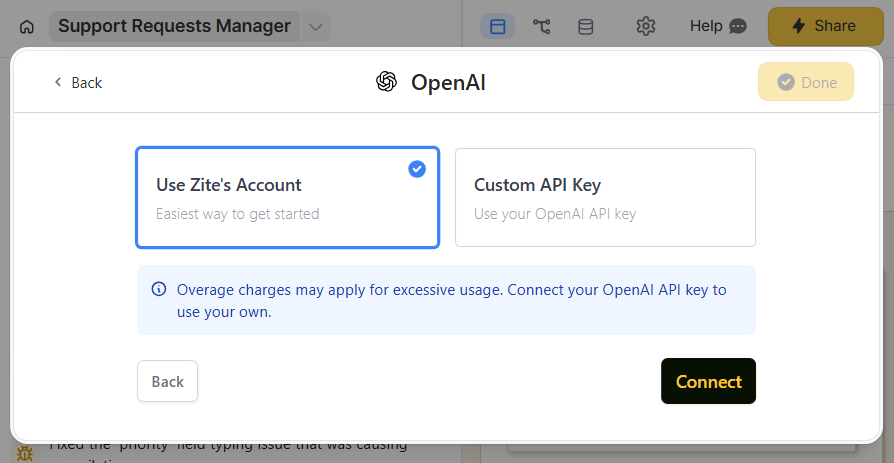
Select the AI model and specify exactly what the AI should do. For our example: "When a new ticket is submitted, use GPT to analyze the issue description and generate a draft response. Save this AI-generated draft to the internal notes field."
Zite creates a workflow that calls OpenAI automatically when triggered.
Pro tip: Be specific! For example, instead of ‘categorize requests,’ try ‘categorize each request as Billing, Technical Support, or Feature Request based on keywords in the submission.’ Precision delivers far better results from your AI.
Step 4: Build your workflow logic
Workflows are the behind-the-scenes rules that run your app. For example, they can decide who gets notified when a ticket arrives or what happens after AI processes a form.
Zite automatically creates workflows from your instructions and presents them visually as flowcharts. Each step is laid out visually so you can understand the logic, inspect inputs and outputs, and identify issues without digging through code.
If a workflow requires an external service like Slack, Zite will prompt you to connect it and automatically add the integration step.
Debugging tip: If a workflow isn't working, open it and click the History tab to inspect past runs. You can view inputs, outputs, and each step to identify what went wrong. You can also ask Zite, "Why is my workflow failing?" and it will suggest fixes.
Step 5: Add user authentication
Zite defaults to internal-only publishing, meaning everyone in your organization already has access. You’ll only need to configure logins if you’re giving access to users outside your organization (for a customer-facing portal, for instance). In this case, tell Zite to add user authentication, and it will guide you through:
- Choosing your user database: Select where to store user accounts. Use Zite's built-in database for simplicity.
- Configuring access: Decide if anyone can sign up, if it's invite-only, or if only certain email domains are allowed.
- Setting permissions: Define what each user role can see and do. For instance, if you’re building an employee portal, you might let employees submit requests, while team leads review reports and handle approvals.
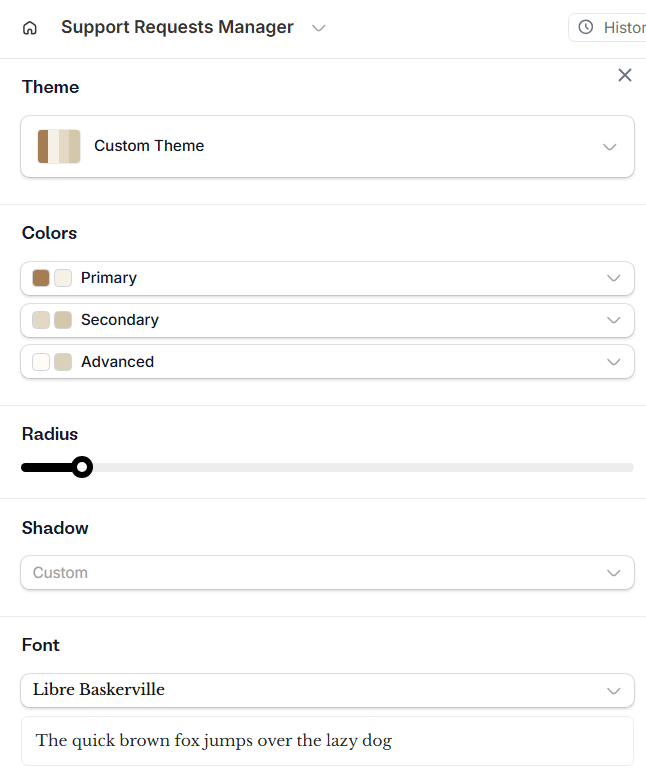
Step 6: Customize the design
Once your workflows are running, customize your app’s look and feel to match your brand. Not only will this boost team engagement, but it also makes your new tool more recognizable.
You have several options:
- Upload an image: Grab a screenshot that represents your desired look (your website, a Dribbble shot). Upload it to Zite and tell it to match the style. You can specify certain elements like fonts or colors.
- Reprompt: Click Edit in the upper right corner, select the element you want to customize, then describe your changes in the chat box.
- Visual editing: Use the visual edit tool to adjust font size, weight, text color, background color, shadows, and other elements directly.
- Use a theme: Click the paintbrush icon on the bottom left, then browse available themes. Themes give you coordinated colors, typography, and spacing that already work well together.
- For advanced users: Zite gives you direct access to the generated code. Edit it to modify how your app works and looks.
Step 7: Launch and share your app
Click Share, then Publish to generate a live link. You'll get a shareable URL ( yourapp.zite.so), but you can personalize your app's URL with custom domains or subdomains.
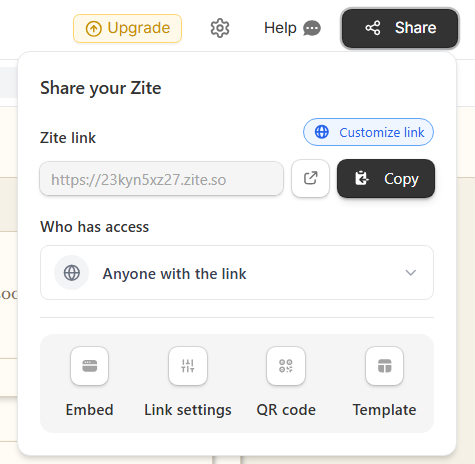
Share the app via:
- Direct link: Send the URL via Slack, email, or add it to your company wiki
- Embed: Add your app to an existing website or intranet
- QR Code: Generate a scannable code that opens your app on mobile devices
For internal tools, you might share the link in your team's Slack channel or add it to your company wiki.
Common mistakes to avoid before deploying your app
Before you hit ‘Publish,’ take note of these common mistakes people make when building AI apps, so you don’t repeat them:
- Vague AI instructions: If you tell the AI to "categorize requests," you'll get inconsistent results. Be specific about the categories, the format of the output, and any edge case handling. The more precise your prompt, the more reliable the generated app.
- Skipping the testing phase: AI doesn't always behave as expected. Test with real-world examples before launching. Pay special attention to edge cases and ambiguous inputs.
- No human review for high-stakes decisions: Build in a human approval step into any workflow that affects customers or finances. Use AI to pre-screen and recommend, not to make final decisions autonomously.
Adding more features to the AI app
Once your AI app is running, consider these improvements:
- Scheduled workflows: Run AI analysis on a schedule. For example, every morning at 9 am, have AI summarize overnight support tickets and post a digest to Slack.
- Conditional routing: Based on AI output, route to different teams or trigger different processes. High-priority billing issues go to senior support; routine technical questions get an auto-response with documentation links.
- Feedback loops: Track when AI categorizations are corrected by humans. Use this data to refine your AI prompts over time.
Zite makes building AI apps easier
Instead of using multiple tools, you can design, run, and maintain production-ready AI apps in a single place with Zite.
Here's how it helps:
- AI-driven app creation: Describe your workflow in plain language, and Zite generates the core app with pages, forms, database tables, and workflow logic.
- Production-ready security: Zite supports user authentication, role-based permissions, and secure hosting. It’s also SOC 2 Type II compliant and supports audit logs and SSO on higher tiers. You're not duct-taping together security after building.
- Built-in database: No need to configure servers or write SQL. Zite's database auto-generates your schema and scales as usage grows. You can also connect existing tools like Airtable or Google Sheets.
- OpenAI integration: Connect your own API key to power AI features within your app like classification, summarization, text generation, and more.
- Visual workflow editor: See exactly how your app's backend logic works through a visual interface. Review each step, inspect past runs, and troubleshoot issues. No code reading required.
- Integrations: Connect Slack, email, Google Sheets, Airtable, and more. Workflows can read from and write to external systems without custom code.
- Unlimited users and apps on all plans, even free: Add as many apps and users to your plan without worrying about per-seat limits.
If you haven't already, sign up for Zite and start building your AI app today. The free tier gives you enough capacity to prototype and test ideas before committing.
Frequently asked questions
How long does it take to create an AI app for business workflows in Zite?
It usually takes just 45–60 minutes to get your first AI-powered business workflow up and running in Zite, even if you’ve never built an app before. Zite generates the initial app in a few minutes, and the remaining time goes into configuring your AI logic, testing, and refining the app.
Do I need programming skills to create an AI app in Zite?
No, you don't need any programming skills. Zite builds the app from natural-language prompts, then lets you review and verify the database and workflow logic in a visual interface. You can inspect steps, test runs, and debug issues without reading code
Can I use my own OpenAI API key with Zite?
Yes, you can connect your own OpenAI API key to create AI-powered apps. Zite's built-in AI powers the app-building experience. Your OpenAI key powers AI features within the apps you build.
How much does it cost to build an AI app in Zite?
Zite is free to get started. The Starter plan costs $19/month and includes unlimited apps and users on your workspace. This Starter plan gives you 100 credits per month, which is typically enough to build and iterate on several apps before you hit any limits. You’ll also need to account for OpenAI API costs or potential overage charges if you rely heavily on Zite’s built‑in AI.